Monday, December 13, 2021

 Hi Stampers!

Today I am sharing a card I did a free technique Facebook Live for, and shared a technique I am calling the stamped stack technique.  I showed a couple of different ways to stamp the layers on two different cards.  The first card is using the now retired stamp set from the last Sale-a-bration called Delicate Dahlias.  I absolutely LOVE the stamp set and all the detail the flowers show.  If you want to learn how to make it, watch the video below, starting at the 2:11 minute mark.   Here is a picture of the card front:
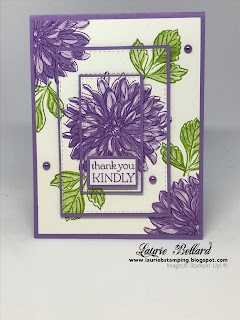


I stamped the artwork on a solid panel of Basic White CS using Gorgeous Grape ink for the flower outline stamp, then Highland Heather ink for the inside flower detail.  I also stamped some leaf outlines in Garden Green ink, then the insides I stamped in Granny Apple Green ink.  I cut out the various layers using the Stitched Rectangle dies.  I then cut Highland Heather CS panels 1/4" larger than the rectangles.  I adhered each panel to its respective mat, then adhered the largest panel onto a Highland Heather card base using Stampin' Seal.  The remaining layers I adhered using Stampin' Dimensionals, trying to align the artwork for each layer to the layer below it.  I stamped the sentiment from the same stamp set and trimmed it with paper snips and layered it as I did the prior layers.  I also adhered it with Stampin' Dimensionals.  I scattered some Pastel Pearls in the darker purple around the card front and the card front was done!

For the card inside, I stamped a dahlia in the Highland Heather ink, going off the lower left corner of the panel.  I adhered this to the card inside with Stampin' Seal.


 The second card I made showed the same technique in a different way.  For this card, I adhered multiple layers of Basic White CS onto each other at various angles like I wanted them on my finished card.  I then stamped floral images from the Hand-Penned stamp set from the current annual catalog in Memento Black ink so I could color them in with Stampin' Blends markers.  Again, I cut mats that were 1/4" larger than the CS panels.  For this card I used Pool Party card base mats, and Pool Party and Pale Papaya Stampin' Blends markers (Light and Dark for both for shading).  For more details, watch the attached video, srarting at 30:35 minute mark.    


For the card inside for this card, I stamped the same flower from the Hand-Penned flower set in Memento Black ink and colored with the same blends colors as the card front.  


If you want to recreate these cards, the measurements and supplies I used are below.  If you need any supplies you can click on the item to be taken straight to that item in my online store to shop with me for whatever you need.  If you would like to watch the YouTube video to see how I created these cards, you can click on it here:

VIDEO LINK


Hope you enjoy making the cards and using this fun technique! If you do try this technique, I would love to hear from you in the comments and let me know how you like it.  

If you live in the United States and don't already have a demonstrator, I would love to help you with your crafting needs.  If you need a catalog, you can select the contact me link in my blog header above and I will get you one in the mail.  If you would like to receive email notification each time I have a new blog post, sign up via my email link on the right sidebar.  

Until next time...
Happy Stamping!
Laurie B.

Cardstock (CS) & Designer Series Paper (DSP):
Dahlia Card:
Highland Heather CS – 4 1/4" x 11”, scored at 5 1/2" - card base; 2 3/4" x 4 1/8" & 1 1/2" x 2 7/8" - card front mats
Basic White CS - 2 @ 4 x 5¼” - card front focal art & card inside

Hand-Penned Card:
Pool Party CS - 4 1/4" x 11", scored at 5 1/2" - card base; 2 3/4" x 4 1/8" & 2 5/8" x 2 1/8" - card front mats
Basic White CS - 2 @ 5 1/4" X 4" - card front & inside; 1 @ 2 5/8" x 4" & 2 1/2" x 2" - card front layers

Product List Dahlia Card:

Hand Penned Product List:

Monday, June 21, 2021

Joseph's Coat Technique cards using In Symmetry and Painted Poppies stamps

Hi Stampers!

I hope your weekend is going well!  I am enjoying father's day with my parents.  I premiered a technique video yesterday which are the cards I am going to show you the details for here.  It is using a new (to me!) technique that has been around for a long time called Joseph's Coat Technique.  It is tons of fun and has SO many possibilities.  I will link the video for these cards below so you can see how I did it, but I also have the card measurements and the supply list used below so you can recreate these cards using this technique, if you like.  Here are the cards:


The first card is using the Painted Poppies stamp set, which was carried over from the last catalog.  I love this set, and it really works nicely with this technique.  You start by sponging various colors on a Basic White CS panel.  The ink colors I used were Pale Papaya, Flirty Flamingo, and Fresh Freesia.  They are all so pretty together!  I sponged all over the panels in random patterns using the new Blending Brushes..... Love, LOVE, L O V E these new brushes!!  They are amazing and smooth the ink onto the panels beautifully.  After completely covering the CS with the various ink colors and letting it dry, I rubbed it completely with an Embossing Buddy (retired product).  I then stamped over the panel in the two flower sizes using Versamark ink, overlapping them slightly to fill the card as desired.  I sprinkled clear embossing powder over the panel, then heat embossed it.  


Next comes the really fun (and somewhat messy) part; I ran a Gorgeous Grape ink pad directly over the panel multiple times until the background was completely a dark purple.  I then wiped all the flowers with a paper towel to remove the ink.  Since this was embossed it resisted the color and could be wiped clean.  What you wind up with is the colors that were sponged on the panel originally peeking through in the embossed stamping, and the rest is the dark purple.  Cool technique, don't you think?  It really has a Wow factor in person!  It does take a minute for this panel to dry since it was layered in ink.  Once  dry, I adhered it to a Fresh Freesia panel.  I then wrapped some of the new Fresh Freesia ribbon around the bottom of the panel and tied a bow in the lower left edge.  I adhered this to a Gorgeous Grape card base.  I stamped the Hey Friend sentiment from the In Symmetry stamp set in Gorgeous Grape ink on a scrap of Fresh Freesia CS and punched it out with the Double Oval punch.  I punched the scalloped oval in Gorgeous Grape CS and layered them together, then placed them over the ribbon using Stampin' Dimensionals.  That's it for the card front for the first card!

For the second card front, I repeated all the same steps.  The only difference was that I substituted the In Symmetry stamp set for the Painted Poppy stamp set.  On that card, I stamped the largest flower from the In Symmetry stamp set, and then stamped it a second time, trying to line up the scalloped center (kind of hard to see in the Versamark ink).  I thought about it after I finished the class that I think it might work to use a Stampin' Write marker and color in a dot at the scalloped edge on each side when you stamp the first half flower.  That would give you a dot to line up with when you stamp the second half.  Have not tried it, so I can't swear that it would work, but I think it might.  If I try it, I will update this post to let you know if it works like I think it will.  I stamped the smaller flowers randomly around the card and filled in with the smallest flowers.  I followed the same steps as the first card to heat emboss and stamp the sentiment.


For the card inside for both cards, I stamped the sentiment from the In Symmetry Stamp set in Gorgeous Grape ink on a Basic White CS panel.  I stamped the small flower in Fresh Freesia ink in the lower left corner.  I stamped a mask of this same flower of the sticky portion of a Post-it-Note and fussy cut it out with Paper Snips.  I placed that over the stamped flower and stamped two leaves from the In Symmetry stamp set in Granny Apple Green ink.  I then adhered this to a Fresh Freesia CS mat and then into the card base.  And that's it!  Gorgeous and FUN cards made!  All I have left to do before sending them to someone special, is stamp some of the same flowers on an envelope to fancy it up as pretty as the card!


If you want to recreate these cards, the measurements and supplies I used are below.  If you need any supplies you can click on the item to be taken straight to that item in my online store to shop with me for whatever you need.  If you would like to watch the YouTube video to see how I created these cards, you can click on it here:


Hope you enjoy making the cards and using this fun technique! If you do try this technique, I would love to hear from you in the comments and let me know how you like it.  

If you live in the United States and don't already have a demonstrator, I would love to help you with your crafting needs.  If you need a catalog, you can select the contact me link in my blog header above and I will get you one in the mail.  If you would like to receive email notification each time I have a new blog post, sign up via my email link on the right sidebar.  

Until next time...
Happy Stamping!
Laurie B.

Cardstock (CS) & Designer Series Paper (DSP):
Gorgeous Grape CS – 5 ½” x 8 ½”, scored at 4 ¼” - card base; 2 ½” x 1 ½” - sentiment mat
Fresh Freesia CS - 2 @ 5 3/8" x 4 1/8" - card front & inside mats; 2 ½” x 1 ½” - sentiment
Basic White CS - 2 @ 4 x 5¼” - card front focal art & card inside
Fresh Freesia 3/8" Open Weave Ribbon - 18"

Product List:

Monday, May 3, 2021

Brushed Blooms Just Because Card

 Hi Stampers!


Monday again, bleh...  I need to figure out a way to love Monday's.  Hmm....   I know, how about I share a card?  Yep, that'll help!  Here is a card a recently made for a team swap.  It uses the Brushed Blooms bundle from the current January-June Mini Catalog.  I LOVE the dies in that set.  They make gorgeous layered flowers.  Actually, the stamp set is also pretty cool.  Here is the card I made:


For the card front, I used the large die from the Beautiful Brushstrokes dies with a piece of Artistry Blooms DSP and ran it through the Stampin' Cut & Emboss machine (SCEM), which cut out the brushstroke looks that allowed the Mango Melody background mat to show through.  I layered these onto a Melon Mambo card base.  Next I cut out 4 large flowers and four smaller flowers, alternating for each flower layer between light and dark CS.  (One large flower and one small that used a Mango Melody base layer, a Daffodil Delight middle layer and a Mango Melody top layer, then a second flower in each size reversing the color layers.)  The other sets of flowers were made using Melon Mambo and Flirty Flamingo.  I also die cut two leaves using Garden Green for the base layer and Granny Apple Green for the top layer.  Once I got them all cut out, it was a matter of aligning each layer (there is a correct layout for these) and adhering them together with Tombow glue.  I next stamped the just because sentiment from the Brushed Blooms stamp set on a large scrap of Basic White CS in Melon Mambo ink and cut it out with the largest shaped die from the Stitched So Sweetly dies.  I centered the sentiment on the card front with Stampin' Dimensionals.  I then layered the flowers around the right side of the sentiments in a cascading flow. using Mini Glue dots for a couple of the ones tucked behind the sentiment and the rest used a glue dot on the area with the sentiment, and a glue dot on the part that hung past the sentiment.  I tucked the two leaves in behind the flowers with Mini Glue dots.  


For the card inside, I used Melon Mambo ink on a Basic White panel to stamp the sentiment from that set that talks about painting the town as long as we are home by 9:00.  I think that sentiment is hilarious, and I know the perfect person for this card!  I am not an out late partier anymore either, I confess.  I am a self-professed night owl, but typically hanging out in my craft room, not out on the town.  😄 

At the bottom of this panel, I adhered one of the brushstroke pieces that cut out from the card front DSP.  I used Mini Glue dots to adhere a flower over that in the lower left corner, then glue this panel onto a Mango Melody mat and into the card inside. 

For the envelope, I stamped a flower from the stamp set in Melon Mambo ink in the lower left front corner.  I adhered another piece of the DSP to the envelope flap and trimmed the excess.  I think the card is gorgeous, and I just love the cascade of flowers around the card front.  So pretty!
   
If you want to recreate this card, the measurements and supplies I used are below in this post.  If you need any supplies you can click on the item to be taken straight to that item in my online store to shop with me for whatever you need.  

Hope you enjoy making the card! If you do make it, I would love to hear from you in the comments and let me know how it went.  

If you live in the United States and don't already have a demonstrator, I would love to help you with your crafting needs.  If you need a catalog, you can select the contact me link in my blog header above and I will get you one in the mail.  If you would like to receive email notification each time I have a new blog post, sign up via my email link on the right sidebar.

Until next time...
Happy Stamping!
Laurie B.


Cardstock (CS) & Designer Series Paper (DSP):
Melon Mambo CS – 5 ½” x 8 ½”, scored at 4 ¼” - card base; 9 ¾” x 1 ½” - flower layers (large & small)
Mango Melody CS - 2 @ 5 3/8" x 4 1/8" - card front & inside mats; 9 ¾” x 1 ½” - flower layers (large & small) 
Flirty Flamingo CS -  9 ¾” x 1 ½” - flower layers (large & small)
Daffodil Delight CS - 9 ¾” x 1 ½” - flower layers (large & small)
Garden Green CS - 4” x 1 ½” - leaves
Granny Apply Green CS - 4” x 1 ½” - leaves   
Artistry Blooms DSP – 1 @ 5 ¼” x 4” – card front mat; 2 ¼” x 6” – envelope flap
Whisper White cardstock – 1 @ 5 ¼” x 4” – card inside; 1 @ 4” x 2 ½” – card front sentiment