Tuesday, January 11, 2022

January 2022 Hand Penned In Symmetry Customer Calendars


I am participating in another Stampin' Up!® Demonstrator Training Program Monthly Blog Hop!  They are so fun!  I am so happy that you could join us today for this blog hop for ideas and creative inspiration. We are a group of Stampin' Up!® Demonstrators from around the world that are taking part in training that is helping us to build a successful Stampin' Up!® business and reach some goals we have set. We really appreciate your support.

You may be starting here or have come from another blog - either way you can find the link list at the bottom of this post so that you can see every blog post today.

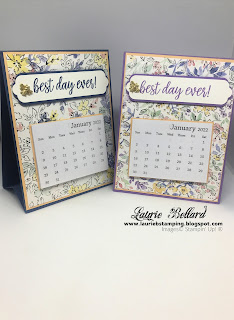
This month instead of a card, I created calendars for all my customers that placed an order this month, as well as my regular "repeat" customers.  It is a way I like to say "Thank You" every year at the start of a new year.  I used the Hand Penned DSP, which is one of my favorites this year from the annual catalog.  It is the most beautiful paper!  I made half of the calendars with a Misty Moonlight base, and the other half with a Highland Heather base.  I kept it very simple and used a stamp from the In Symmetry Stamp Set stamped in the same color as the the card stock.  I used the die from the Seasonal Labels dies to cut the sentiment and the sentiment background mat.  A single Bumblebee Trinket to the left of the sentiment finished it off perfectly!


I
Here is a picture of both color calendars standing up.  


Simple, but pretty, I think.  Hopefully everyone likes them and can use them.  If you want to recreate these calendars, the measurements and supplies I used are below.  If you need any supplies you can click on the item to be taken straight to that item in my online store to shop with me for whatever you need.  

Thanks for stopping by my blog and use the links below to continue on with the hop.

BLOG HOP LINKS:

Until next time...
Happy Stamping!
Laurie B.

Cardstock (CS) & Designer Series Paper (DSP):
Misty Moonlight OR Highland Heather CS - 
o  4 1/4" x 11", scored at 5 1/2" calendar easel
o  4 1/4" x 5, scored at 1 1/4", 2 1/2", 3 3/4" (folded in valley/mountain folds) - calendar base
o  1" x 4" - sentiment mat (cut in half horizontally)
Pale Papaya CS - 
o  5 3/8" x 4 1/8" - base mat for DSP
o  3 1/8" x 2 3/8" - calendar mat
Basic White CS - 
o  1" x 4" - sentiment
Hand-Penned DSP - 
o  5 1/4" x 4"
Calendars - Non-Stampin' Up! - (Taylored Expressions)

Product List:

Monday, January 3, 2022

Stampin' Up! Daffodil Daydream Hello Card

Hello Stampers!  

Happy New Year!!  Wow, it is almost the 3rd day of 2022 already!  My how time flies.  I have to ask, are you a resolution kind of person?  Well, I try to be; I always set them and start out with a bang to typically give up by mid-to end of January.  We will see how this year goes.  One of my resolutions was to challenge myself by participating in stamping and card challenges.  Although I didn't actually get it done in time to participate in the challenge, I did use the sketch, so I am calling it a success. 😉  Next time I will try to be done before the deadline! 

I am using the Daffodil Daydream stamp set that is going to be in the January - June 2022 catalog that goes live January 4, 2022 (day after tomorrow!).  I also used Daffodil Afternoon DSP that is FREE in the Sale-A-Bration brochure that goes live the same day.  The sentiment I heat embossed in Black using the Hello from the Biggest Wish stamp set.


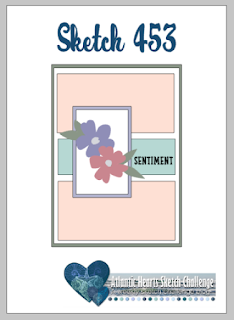
  I used sketch 453 from Atlantic Heart Sketch Challenge.  Here it is:


  • Stamp the flowers with Tuxedo Black Memento Ink on small Basic White CS panel.
  • Use Light and Dark (LT/DK) Daffodil Delight and Mossy Meadow Stampin' Blends to color flowers and leaves.
  • Stamp the sentiment in Versamark Ink on smallest strip of Daffodil CS, almost all the way to the right edge.  Sprinkle with Black Embossing powder and heat with heat tool to set.
  • Assmble DSP and sentiment following sketch design on a piece of Basic White CS, then onto the card base with Liquid Glue, as shown.  Adhere the stamped daffodil panel to the Basic Black CS and place on card front to left of sentiment using Dimensionals. 
  • Attach a large Brushed Brass Butterfly to the right of the sentiment, and two small ones scattered around the flowers.

  • Stamp butterflies in the upper right and lower left corners on a Basic White CS panel and color with LT/DK Daffodil Stampin' Blends.  
  • Adhere this panel to a Daffodil CS mat, then to the inside of the card.


Finally, I repeated the butterfly stamp and coloring on the lower left corner of an envelope front and adhered the reverse side of the DSP to the envelope flap.  Must make sure the envelope is as pretty as the card!

I hope you enjoyed my card today!  If you want to recreate this card, the  measurements and supplies I used are below.  If you live in the USA and don't already have a demonstrator, I would love to assist you with your crafting needs.  If you would like a copy of the new catalog, please let me know, and I will be glad to send you one.

Until next time...
Happy Stamping!
Laurie B.

Cardstock (CS) & Designer Series Paper (DSP):
Basic Black CS – 11" x 4 1/4", scored at  5 1/2" - card base; 4" x 2" - card front flower mat
Basic White CS - 5 3/8" x 4 1/8" - card front background mat; 5 1/4" x 4" - card inside; 3 7/8" x 1 7/8" - card front focal art
Daffodil Delight CS - 1" x 4" - card front sentiment mat
Daffodil Afternoon DSP - 2 @ 2" x 4" - card front DSP layers; 2" x 6" - envelope flap

Product List:
Please use Host Code PQ2DADBG when placing orders under $150 during the month of January 2022.
The new products are not available until January 4th.  Therefore, they are not included in this clickable Shopping List. 


Monday, December 13, 2021

December 2021 Customer Thank You Very Versailles cards


 Hi Stampers!

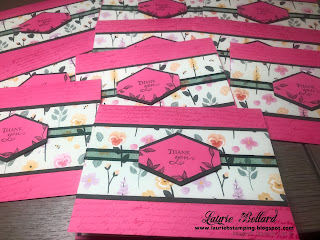
Today I am taking part in my very first blog hop ever!  I am so excited to share my customer Thank You card for December.  I am using a stamp set from the annual catalog today called Very Versailles.  It is a really pretty set that I have not used in a while.  It is a simple card that works well to mass produce.  Here is how I did it:
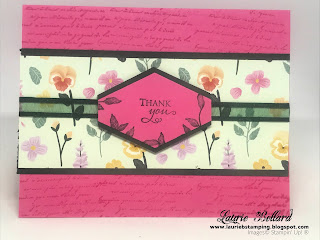


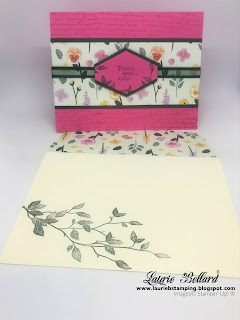
I stamped the word stamp from the Very Versailles stamp set in Polished Pink ink all over the card front for a tone on tone look.  I cut a piece of DSP from the Pansy Petal DSP and adhered that to a panel of Evening Evergreen, then ran some of the Evening Evergreen 3/8" Open Weave Ribbon across the center of the panel and adhered to the back with adhesive.  I then adhered this to the card front with Stampin' Seal.  I took a scrap of the Polished Pink CS and Evening Evergreen CS and used the Tailored Tag punch to punch out one of each color.  I stamped the Thank You sentiment in the center of the die cut and stamped leaves from the large leaf stamp around the bottom edges in Evening Evergreen ink.  I cut the Evening Evergreen die cut in half horizontally and adhered to the back of the stamped die cut.  I adhered this to the center of the card front over the ribbon with dimensionals.
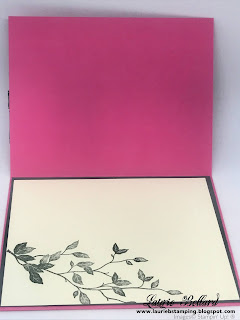


For the inside of the card, I stamped the large leaves stamp in Evening Evergreen ink in the lower left corner of a Very Vanilla panel, going off the edge.  I adhered this to an Evening Evergreen mat and then into the card inside.  


I repeated the stamped leaf step in the lower left corner of the envelope front and adhered a piece of DSP to the envelope flap with Tombow glue and trimmed down the excess.  In no time, I had a stack of cards to send to my customers who shopped with me this month.  I thought it was a pretty card; hopefully they will like it too!  


If you want to recreate these cards, the measurements and supplies I used are below.  If you need any supplies you can click on the item to be taken straight to that item in my online store to shop with me for whatever you need.  

Thanks for stopping by my blog and use the links below to continue on with the hop.
Blog Hop Links:


Until next time...
Happy Stamping!
Laurie B.

Cardstock (CS) & Designer Series Paper (DSP):
Polished Pink CS – 5 1/2" x 8 1/2", scored at  4 1/4" - card base; scrap for card front sentiment die cut
Evening Evergreen CS - 5 3/8" x 4 1/8" - card inside mat; 5 1/2" x 2 1/4" - Card front mat; scrap for card front sentiment mat
Very Vanilla CS - 1 @ 4 x 5¼” - card inside
Pansy Petals DSP - 5 1/2" x 2 1/2" - card front mat; 2 1/4" x 6" - envelope flap

Product List: