Sunday, March 13, 2022

Pansy Patch Hello Card

  Hello Stampers!  


Happy Sunday!!  I seem to be starting a tradition....a Sunday Sketch post!  I am having so much fun with sketch challenges and have another one for you today.  This week's challenge really called for flowers and the Pansy Suite is one of my favorites in the current Stampin' Up! catalog.  Since today was the start of daylight saving time in the United States, that extra hour of sunshine is a sure reminder of spring so this suite seemed appropriate.  Here is my card:


I used this week's Atlantic Heart Sketch Challenge.  It is sketch #463 and here it is: 


The card is super simple but has a real wow factor.  It is really all about the Designer Series Paper (DSP).  Those pansies are cut outs from the DSP, but they look so real.  I love all the spring-y colors.  With minimal stamping and a little embossing and die cutting, the card was finished.  
  • I used Stampin' Write markers directly to the stamps for the card front sentiment so I could use two different colors (Pale Papaya and Fresh Freesia).  
  • I dry embossed the pretty floral pattern on the Pale Papaya background mat, just to add a little texture.  I added strips of the Pansy DSP to Basic White mats and layered it on the card front following the sketch layout. 
  • A few Pansies and leaves cut from the Pansy DSP, arranged to provide the focal point of the card front.  Some matching pink jewels and the card front was done.  I added another sentiment from the stamp set in the center of the card inside and a small scrap of the floral DSP and it was done.  I know just the person I am sending it to and I know it will brighten her day!


For the envelope front, I stamped the small flower from the Pansy Patch stamp set in Polished Pink ink, by stamping the background stamp off once to lighten the base color.  This is a "two-step" stamp, so the top layer detailed stamp I stamped in the same color, just in full strength.  Isn't is just so pretty?  
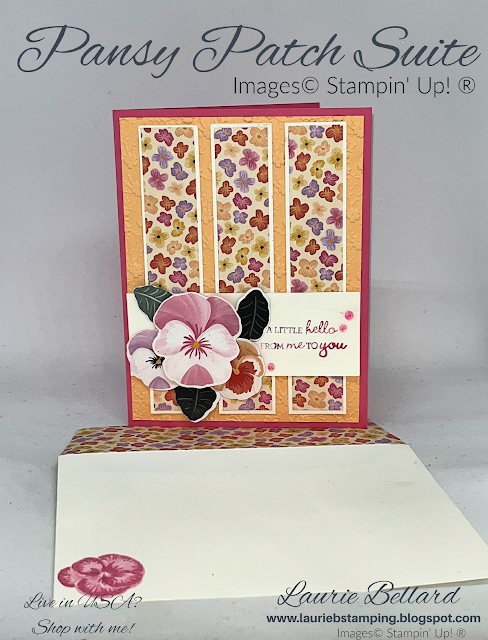

More of the same DSP on the envelope flap to tie it all together and card done!  Really a simple card, that will brighten anyone's day, I think.

I hope you enjoyed my card today!  If you want to recreate this card, the  measurements and supplies I used are below.  If you live in the USA and don't already have a demonstrator, I would love to assist you with your crafting needs.  If you would like a copy of the new catalog or a calendar of my class schedule, please let me know, and I will be glad to send you one.

Until next time...
Happy Stamping!
Laurie B.

Cardstock (CS) & Designer Series Paper (DSP):
Polished Pink CS – 8 1/2" x 5 1/2", scored at  4 1/4" - card base
Pale Papaya CS - 2 @  5 1/4" x 4" - card front & inside mats
Basic White CS - 3 @ 1" x 5" - card front background mats; 1 @ 1 1/2" x 4" - card front sentiment; 1 @ 5 1/8" x 3 7/8" - card inside
Pansy Petal DSP - 3 @ 7/8"  x 4 7/8" - card front; 3/8" x 5 1/8" - card inside decorative strip; Pansy & Leaf die cuts; 2" x 6" - envelope flap

Product List:
Please use Host Code ZEX2BHDP when placing orders under $150.00.  I will send you a hand-made card and a little gift for your order.  Please feel free to contact me with any questions.


Sunday, March 6, 2022

Kite Delight Friendship Card

 Hello Stampers!  


Happy Sunday!!  It turned out to be such a nice sunny afternoon here in Central Texas that is has me excited that spring is almost here!  Today's card really captures a fun spring day activity....kite flying!  I used the stamp set Kite Delight from the current Stampin' Up! Mini Catalog (January-June), which is just the cutest stamp set!  I used to love flying kites on a windy spring day back when I was a kid.  Let's move on and not talk about just how long ago that was. 😏  


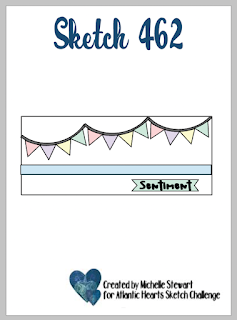
 I have been on a bit of a roll with sketch card challenges lately, and I used this week's Atlantic Heart Sketch Challenge.  It is sketch #462 and here it is: 


The card was so fun and easy to make.  A little stamping, coloring with blends, and some gluing and just like that, card done!
  • The sentiments were stamped in Memento Black ink on Basic White CS and colored with various Stampin' Blends.  The clouds were stamped in Pool Party ink and the sun in Daffodil Delight.  
  • I did dry emboss a strip of Granny Apple Green CS with the Gingham Embossing folder to try to resemble grass blades (it kinda, sorta worked...as long as you don't look at it too closely and maybe squint a little too). 😊
  • I then assembled the card as the sketch showed, and added another stamp of kite strings in the top left corner of the card inside, both for color and to carry the theme of the card to the inside.  Another sentiment from the stamp set in the center of the card inside and it was done.  Easy, peasy!


I used a legal size store bought envelope from the Dollar store and stamped the kite and colored it with Stampin' Write markers to prevent bleed through.

I stamped more clouds and sun on the envelope flap.  You know you can't send bare envelopes when you send a hand-made card.  I am sure there is a rule about that somewhere.  If not, there oughta be! 

I hope you enjoyed my card today!  If you want to recreate this card, the  measurements and supplies I used are below.  If you live in the USA and don't already have a demonstrator, I would love to assist you with your crafting needs.  If you would like a copy of the new catalog or a calendar of my class schedule, please let me know, and I will be glad to send you one.

Until next time...
Happy Stamping!
Laurie B.

Cardstock (CS) & Designer Series Paper (DSP):
Polished Pink CS – 7" x 8 1/4", scored at  3 1/2" on the 7" side - card base
Daffodil Delight CS - 2 @  3 3/8" x 8 1/8" - card front & inside mats
Granny Apple Green CS - 1 @ 1" x 8" - card front
Basic White CS - 2 @ 3 1/4"  x 8" - card front & inside

Product List:
Please use Host Code ZEX2BHDP when placing orders under $150.00.  I will send you a hand-made card and a little gift for your order.  Please feel free to contact me with any questions.

Sunday, February 27, 2022

Awesome Otters Hello Card

  Hello Stampers!  


I am so enjoying how sketch challenges are sparking my creative mojo!!  They are so much fun so I am not sure why I was so intimidated by them.  I am doing another Atlantic Card Sketch Chellenge this week.  Since it is the next to the last day of Stampin' Up! Sale-a-bration, and I had not used the Awesome Otters stamp set yet, I pulled that out and got to work.  I paired it with another fabulous Sale-a-bration freebie, the Simply Marbleous DSP, which I thought looked like water and was a match made in heaven for the otters!  


I used sketch 461 from Atlantic Heart Sketch Challenge.  Here it is:

                                             
The card came together pretty quickly.  Here were the steps:
  • I stamped the otters on Basic White CS scrap pieces and cut them out with the layer circle dies.  I also cut a scalloped circle die in the next larger size in Misty Moonlight CS as a background mat.  I used Stampin' Blends to color in the water and the otter. 
  • I embossed a 1" strip of Basic White CS and embossed it with the Bark 3D embossing folder and used a Blending Brush and Misty Moonlight ink to lightly sponge the "waves".
  • I layered a 1" strip of the script font vellum from the Layering Designs Vellum, overlapping it behind the Basic White CS layer with glue dots, and placed it in the center of the card front on top of the wavy side of the DSP.
  • I stamped the sentiment Hello sentiment from the Garden Birdhouses stamp set in Misty Moonlight ink on Basic White CS and bannered the right side with the Banner Pick a Punch.  I also lightly sponged around the edges of the sentiment before adhering it in the lower left corner of the card front with glue dots.
  • A few strategically placed Opal Rounds on the card front and it was done!
  • I added a sentiment on the Basic White CS for the card inside using the now retired In Your Words stamp set from the last Sale-a-bration as the set just has such awesome sentiments.  But you could use any sentiment stamp.  I also stamped another otter in the lower left corner and colored it similar to the other ones.  I used a scrap strip of the DSP to decorate the right side of the card inside.


On the envelope front, I stamped another swimming otter and colored it in as before.  Some more wavy DSP on the envelope flap, and it was done too!


I hope you enjoyed my card today!  If you want to recreate this card, the  measurements and supplies I used are below.  If you live in the USA and don't already have a demonstrator, I would love to assist you with your crafting needs.  If you would like a copy of the new catalog or a calendar of my class schedule, please let me know, and I will be glad to send you one.

Until next time...
Happy Stamping!
Laurie B.

Cardstock (CS) & Designer Series Paper (DSP):
Night of Navy CS – 8 1/2" x 5 1/2", scored at  4 1/4"- card base
Misty Moonlight CS - 1@ 3" x 3" - scalloped circle
Basic White CS - 5 1/4" x 4"- card inside; 1 @ 3" x 3" - layering circle card front; 1" x 2" - card front sentiment; 1" x 5 1/4" - layering mat for embossing
Layering Designs Vellum - 1 @ 1" x 5 1/4" - card front layer
Simply Marbelous DSP - (Misty Moonlight/ight of Navy color) 1 @ 5 1/4" x 4" - card front DSP layer, 1/2" x 4" - card inside decorative strip; 2" x 6" - envelope flap

Product List:
Please use Host Code JSSS2HNM when placing orders under $150 during the month of February 2022.  Also, remember this is the last month of Sale-a-Bration which means that you earn a free product for every $50.00 purchased!  See the catalog links on the right side of my blog to see what you can earn for free.  Please feel free to contact me with any questions.

Product List