Hi Stampers!
I am participating in another Stampin' Up!® Demonstrator Training Program Monthly Blog Hop! They are so fun! I am so happy that you could join us today for this blog hop for ideas and creative inspiration. We are a group of Stampin' Up!® Demonstrators from around the world that are taking part in training that is helping us to build a successful Stampin' Up!® business and reach some goals we have set. We really appreciate your support.
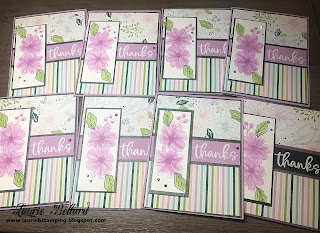
You may be starting here or have come from another blog - either way you can find the link list at the bottom of this post so that you can see every blog post today. This is my customer Thank You cards for February. They are using the current Friendly Hello Sale-a-Bration stamp set and DSP that you can get FREE with a $100.00 order now through February 28th. I LOVE this stamp set and DSP.
Here are the instructions for how I did it:
- Stamp the Thanks sentiment from Biggest Wish stamp set in Versamark ink on right side of a small strip of Fresh Freesia CS.
- Sprinkle with White embossing powder and use heat tool to melt and set.
- Adhere floral DSP panel on top and striped DSP on bottom of an Evening Evergreen Shimmer Vellum panel. Center Thanks sentiment CS strip between the two DSP panels and place on card front.
- On a Basic White CS panel, stamp the flowers from the Friendly Hello stamp set in Fresh Freesia ink and the leaves in Evening Evergreen ink.
- Use Light and Dark (LT/DK) Fresh Freesia and Granny Apple Green Stampin' Blends to color flowers and leaves, and color lifter to lighten and shade in certain areas.
- Adhere to another piece of Evening Evergreen Shimmer Vellum and adhere to left of sentiment on card front using Dimensionals.
- Place several 2021-2023 In Color Jewels around card front.
- Stamp sentiment for card inside on panel of Basic White in Evening Evergreen ink and place small strip of floral DSP to left side of panel, then adhere to another panel of Shimmer Vellum and then to the card inside.
The card is simple to put together which made quick work of the stack of cards I needed to create. I hope all my customers who shopped with me this month like them as much as I do!
If you want to recreate these cards, the measurements and supplies I used are below. If you need any supplies you can click on the item to be taken straight to that item in my online store to shop with me for whatever you need.
Thanks for stopping by my blog and use the links below to continue on with the hop.
Blog Hop Links:
Until next time...
Happy Stamping!
Laurie B.
Fresh Freesia CS – 5 1/2" x 8 1/2", scored at 4 1/4" - card base; 1" x 4" strip for card front sentiment
Evening Evergreen In Color Shimmer Vellum - 2 @ 5 3/8" x 4 1/8" - card inside & card front background mats; 4" x 1 3/4" - card front floral background mat
Basic White CS - 1 5/8" x 3 7/8" - floral panel for card front
Friendly Hello DSP - Floral pattern - 1@ 2" x 4" - card front; 3/4" x 5 1/4" - card inside decoration;
Striped Pattern - 1@ 2" x 4" - card front; 2" x 6" - envelope flap


Love your card and the DSP!
ReplyDeleteThanks, DeeDee! I love the DSP too.
DeleteLove this!
ReplyDeleteThank you, Tamara.
DeleteThere are so many options with these papers! I love your combo!
ReplyDeleteThanks Rebecca!
DeleteSo pretty! I love the layout!
ReplyDeleteThank you.
DeleteSuch a pretty card!
ReplyDeleteThanks, Melva.
DeleteLovely Cards. I love this DSP. Thanks for Sharing.
ReplyDeleteThanks, Trish. Yes, I love this DSP too!
DeleteGreat card Laurie, great showcase for this pretty dsp x
ReplyDeleteThanks Mo!
DeleteLovely card Laurie! Great layout. Thank you for taking part in our Demonstrator Training Blog Hop this month!
ReplyDeleteThanks, Kylie! I am finding hopping lots of fun instead of scary now that I have it figured out. :)
DeleteLove the layout and the pretty DSP
ReplyDeleteThanks Rookaya
DeleteGreat card Laurie!
ReplyDelete